Best way to learn linux is to modify it and see how it bahaves. The biggest problem the newbies/students find is the unavailability of a Test Machine to do their experiments.
But, you don’t need a separate physical machine to load/test your linux OS. If you have a desktop PC, you can create as many virtual machines as you want out of it and run as many Operating Systems (Linux/BSD/Solaris etc) on it. The solution is VMWare Workstation.
In this post we will see how to create a Virtual Machine using VMware Workstation and load Linux on it.
In this post we will see how to create a Virtual Machine using VMware Workstation and load Linux on it.
You can get the trial verison of VMWare Workstation from VMWare Website.
Step 1
Start VMWare Workstation. You will get the following screen.

Step 1
Start VMWare Workstation. You will get the following screen.
Step 2
On the left panel, Right Click and Select New > Virtual Machine
Or Chose File > New > Virtual Machine
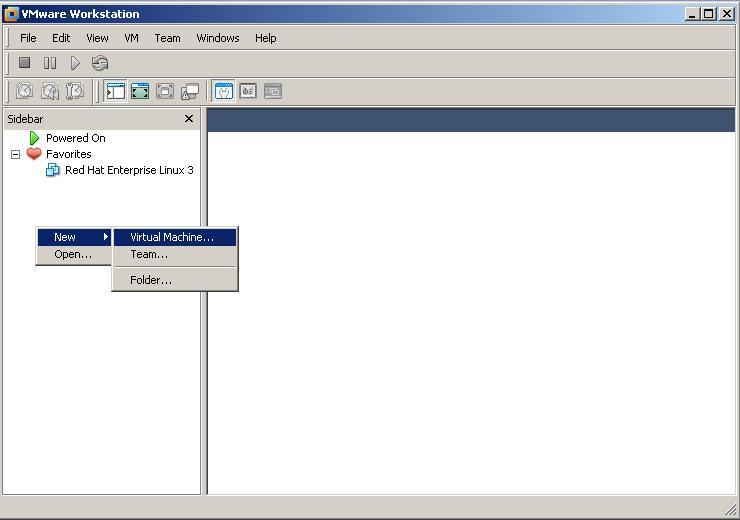
On the left panel, Right Click and Select New > Virtual Machine
Or Chose File > New > Virtual Machine
Step 3
Chose the type of Configuration. Select Typical

Step 4
Guest Operating System Installation. Chose “I will install Operating System Later”.

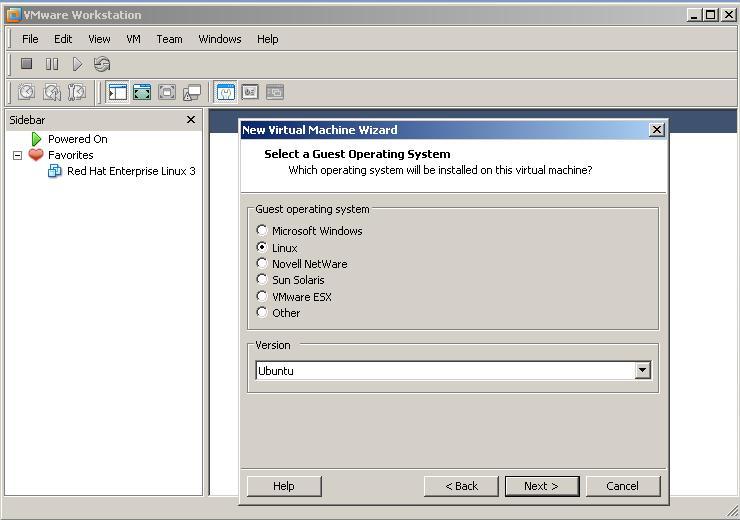
Step 5
Select a Guest Operating System. You may chose whatevere OS you would like to install. I chose Linux
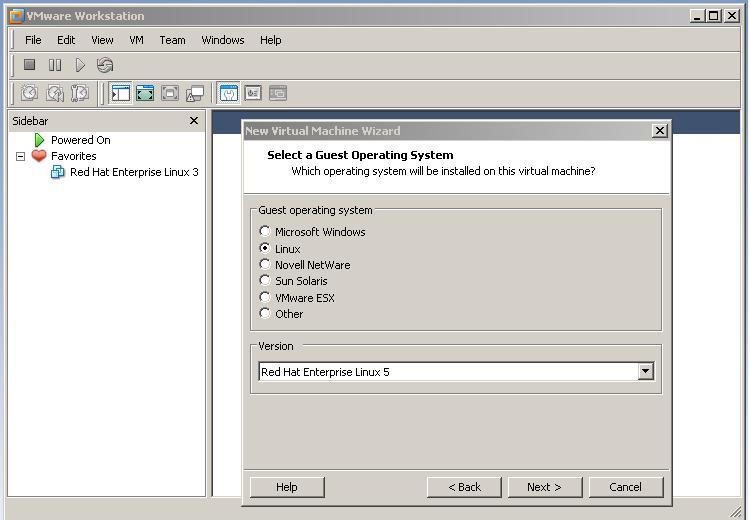
Step 6
Chose the Version of OS. For eg. I want to install Red Hat Enterperise 5, So from the dropdown menu I select that.
 Step 7
Name the Virtual Machine. Here you chose a name for your virtual machine. By default, workstation will assign some meaningful name to your virtual machine. In this case, it assigns “Red Hat Enterprise Linux 5”.
You also need to chose a location on your hard disk where you want to store the files related to your virtual machine being created. You may go ahead with the deafult location that Vmware Workstation choses for you by default

Step 8
Chose the number of processors for your virtual machine
 Step 9
Memory for your virtual machine. Chose how much memory (RAM) you would like to give to your virtual machine, Minimum recommended is 512 MB.
 Step 10
Chose the network type. Select Bridged Netwroking
 Step 11
Select I/O Adapte types. Chose SCSI Adpater > LSI Logic
 Step 12
Add a hard disk to your Virtual Machine. Chose “Create a new virtual disk”.
 Step 13
Select Disk Type. Chose SCSI

Step 14
Specify the size of your disk. Chose 8GB and select “store virtual disk as a single file”.

Step 15
Specify the location where you would like to keep your disk file

Step 16
Congrats. Your virtual machine is ready. Click Finish to download some OS on it.

Step 17
After you successfully create a virtual machine you will see the following screen
I already had one Virtual machine created (Red Hat Enterprise 3) and below you see the new virtual machine (Red Hat Enterprise Linux 5) that we created just now

Step 18
Now, we need to load the OS on our virtual machine. We will use the virtual CD to load the OS on it. We can attach an ISO image of the Red Hat Enterpise CD to our virtual CD. There are software available that may be used to convert your bootable CD to an ISO image file.
To do this, click “Edit virtual machine settings”

Step 19
Chose ISO image file and specify the location of the ISO image file of your OS.
Chose "Connect at power on"

Step 20
Now, lets Power On the virtual machine. Click the green button "Power On this virtual machine"

Step 21
As you have already attached the ISO image of your bootable CD to the virtual CD drive, the virtual machine starts booting from it. You will see the following screen.

From here you need to follow the same steps as you do for any normal installation.
So, you have a complete virtual machine with hard disk, network card, CD Drive, USB Controller, floppy, CPU and a dislay.
You may create as many virtual machines as you want and load whatever OS you want to load on it.
Isn't this amazing.
Have Fun !!!
Chose the type of Configuration. Select Typical
Step 4
Guest Operating System Installation. Chose “I will install Operating System Later”.
Step 5
Select a Guest Operating System. You may chose whatevere OS you would like to install. I chose Linux
Step 6
Chose the Version of OS. For eg. I want to install Red Hat Enterperise 5, So from the dropdown menu I select that.
Name the Virtual Machine. Here you chose a name for your virtual machine. By default, workstation will assign some meaningful name to your virtual machine. In this case, it assigns “Red Hat Enterprise Linux 5”.
You also need to chose a location on your hard disk where you want to store the files related to your virtual machine being created. You may go ahead with the deafult location that Vmware Workstation choses for you by default
Step 8
Chose the number of processors for your virtual machine
Memory for your virtual machine. Chose how much memory (RAM) you would like to give to your virtual machine, Minimum recommended is 512 MB.
Chose the network type. Select Bridged Netwroking
Select I/O Adapte types. Chose SCSI Adpater > LSI Logic
Add a hard disk to your Virtual Machine. Chose “Create a new virtual disk”.
Select Disk Type. Chose SCSI
Step 14
Specify the size of your disk. Chose 8GB and select “store virtual disk as a single file”.
Step 15
Specify the location where you would like to keep your disk file
Step 16
Congrats. Your virtual machine is ready. Click Finish to download some OS on it.
Step 17
After you successfully create a virtual machine you will see the following screen
I already had one Virtual machine created (Red Hat Enterprise 3) and below you see the new virtual machine (Red Hat Enterprise Linux 5) that we created just now
Step 18
Now, we need to load the OS on our virtual machine. We will use the virtual CD to load the OS on it. We can attach an ISO image of the Red Hat Enterpise CD to our virtual CD. There are software available that may be used to convert your bootable CD to an ISO image file.
To do this, click “Edit virtual machine settings”
Step 19
Chose ISO image file and specify the location of the ISO image file of your OS.
Chose "Connect at power on"
Step 20
Now, lets Power On the virtual machine. Click the green button "Power On this virtual machine"
Step 21
As you have already attached the ISO image of your bootable CD to the virtual CD drive, the virtual machine starts booting from it. You will see the following screen.
From here you need to follow the same steps as you do for any normal installation.
So, you have a complete virtual machine with hard disk, network card, CD Drive, USB Controller, floppy, CPU and a dislay.
You may create as many virtual machines as you want and load whatever OS you want to load on it.
Isn't this amazing.
Have Fun !!!
good one !!!!alistofthingstodo.blogspot.com
ReplyDelete